Showing posts with label repurposed. Show all posts

Friday, August 7, 2015

Book Shelf Make Over with Removable Decorative Back


I recently completed a book shelf makeover for my master bedroom remodel (which is still in progress, 3 weeks later). This particular book shelf was inherited from my MIL. It has currently been serving as Hunky Hubby's night stand. 
It is a solid wood shelf with a laminate top.
Of course I forgot to take a good 'before' photo. However, you can make it out in the grainy photo below. 
It was a nice sturdy shelf, but there was nothing remarkable about it. Essentially, it just didn't go along with our new look for our bedroom. So, it was time to make it over.


I began by sanding the laminate top slightly to rough it up. 
Because of the top, I chose to use chalk paint on this project.


Chalk paint does a good job of adhering to just about any surface.


After two coats of paint on most areas, 3 on the top, I distressed the shelf with some sand paper. I wanted it to have a shabby chic look. Then, I sealed it all with a polyurethane finish. 
I had used the wax that is usually recommended on chalk paint on a previous project. So far I am unimpressed with it. It seems to collect all the dust and dirt even after being buffed. I wanted a more durable finish on this shelf, so poly it is. 
I do think that the poly slightly yellowed the paint color, even though it said it wasn't supposed to. It isn't enough that most people would really notice though.


I left the back of the shelf unpainted because I wanted to cover it with something decorative. However, I change my mind a lot so I also wanted it to be something that would be able to be removed. I decided to wrap some foam core boards that I had picked up at the dollar store with fabric. I measured the space at the back of the shelves and cut my boards accordingly.


For my fabric, I decided to up-cycle a cute scarf that was hanging in my closet. It had the right color scheme and pattern. 


I wrapped each board in the fabric and used duct tape to secure it. 
In hind sight, I would not use this type of fabric again simply because it was very stretchy.


When that was done, I used duct tape loops on the back of each board to adhere it to the back of the shelf.


I am really pleased with the final result. I know the fabric isn't completely straight (I blame that stretchy quality of the fabric I was talking about earlier), however because its the back of the shelf, I'm not really concerned about it. It will mostly be covered up.


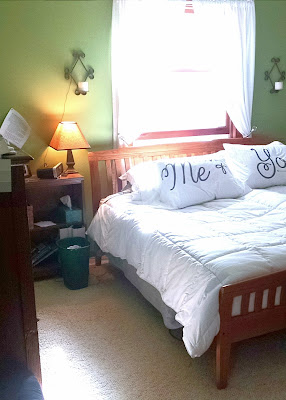
Here is a view of the shelf in our space, ready for use. I included all of the things my husband likes to keep on his bedside table. Even the ugly alarm clock. I get a little irritated when you see a great project in someone's space that is styled in a very unrealistic way. Everything in our home needs to first be functional and then be stylish. 
This shelf is something that will be used daily. My husband needs his alarm clock, so it's a part of the shelf. However, I was able to hide the ever present kleenex box with a cute little wooden crate from TJ Maxx. The lamp is also from TJ Maxx. Everything else is either so old I don't remember where it came from or it's a personally made item. Like that cute little plane my son painted for his Daddy on Father's Day. Presh. 


Hopefully this little project inspires you to make over a drab piece of furniture in your home. I enjoy giving new life to things. This tired wooden shelf now looks updated and fresh. Which is kinda funny considering I distressed it! 


Pin It

Monday, June 29, 2015

Repurposed on Purpose - Bandanna Napkins


Are you looking for a fun and easy way to dress up your summer dinner table? What about an easy and fun napkin solution? 
Have you ever thought about using Bandannas? 


Last summer my mom purchased about 12 bandannas for me in bright colors to use as napkins. They are great! 
The size is perfect, they wash up well (make sure you buy the 100% cotton ones), and they do a great job of cleaning hands and faces. They are also pretty inexpensive. We found these for less than $1 a piece. Bandannas can be found in a wide variety of colors. I liked these bright ones for summer. But this year I was thinking of getting red, white, and blue for the July 4th holiday.

You can find Bandannas at a variety of stores, Hobby Lobby, Wal-Mart, etc... They are pretty easy to come by. 

I stopped using paper napkins a couple of years ago and I don't regret it. We still keep paper towels around, but I really like using cloth napkins at our dinner table.


Adding a few cloths to the laundry is no big deal and they do a much better job of cleaning up certain messes than paper napkins do. 
Have you ever tried wiping grilled chicken off your hands with a paper napkin and ended up with more napkin on your hands than chicken on the napkin? I have. 


I like to fold our napkin bandannas up and keep them in a cute basket right in the middle of our table. It makes them readily available for everyone. 
Sometimes, company doesn't know what to do and so we show 'em! Just wipe that barbecue sauce right on that napkin, Mr. You'll be glad you did! 
Cloth napkins last for years and can be reused many times. I like to watch for different ones on clearance and switch them up for the seasons. It is a fun way to dress up your dining room table. 
Plus, I always feel a little fancier using my cloth napkins.
Maybe a little of that fancy feeling will eventually rub off on my man cubs in the form of better table manners. 
Hey, a mom can hope, right?!


Pin It

Thursday, May 2, 2013

Ugly Thrift Store Art Gets a Makeover

This summer I helped plan a wedding shower.  
I wanted to make a fun chalk board that could be used not only as a shower decoration but also as a gift.
I scoured the local Goodwill for a suitable frame.  
I loved the oval shape of this piece, but the art inside: 
Hideous! 
In case you can' tell, there is a collage of dried flowers and mushrooms on top of a 
terry cloth towel in that frame.
I'm sure it was cool once. 
Maybe.
But, it had good bones, so I went for it. 
I even got it half off.


A little white spray paint, and a couple layers of 
chalk board paint on the glass, 
and we now have a beautiful message board.


This project cost very little, especially if you happen to have leftover chalk board paint laying around. 
Plus, the bride-to-be was happy to learn she got to take it home. 

Win-win!!

Happy crafting! 

Pin It

Tuesday, March 12, 2013

Got Mah Hair Done!


I've got boys. 
3 of them to be exact. 
And no daughters, just to be clear. 
But that doesn't mean it's all dirt and armpit farts around here. Although it is like that around here a lot. 
Sometimes my boys like to show me their soft side and they like to do my hair.
Exhibit A:

Now as their Mommy, I absolutely LOVE when they decide to do this.  Even though it means the loss of some extra hairs for me. I just think it is so sweet.  Plus, I figure it's good training for when they are married one day.  Almost every girl I know likes to have her hair brushed by someone else.
What I think is hilarious is that they have absolutely no idea how to make a pony tail (I had to help with these).  Usually in their attempt to make a pony tail, they end up making a knot. Out of my hair. And lets not even talk about braids. This is not a skill boys are born with people.  I'm not sure when little girls learn this stuff, seeing as I don't have any of my own to watch.  But it is cute how my boys try and make me look 'beautiful'. 
 And just so you know, I dutifully wore my hair like this for at least an hour so their Daddy could see it when he got home. Even though my boys and I have different ideas on what beautiful hair looks like. 


Plus, it absolutely melts my heart when they look at me and say "You look pretty Mommy". Especially when I'm still in my yoga pants and wearing yesterdays makeup.  I don't care one whit then that we have different opinions of whats 'beautiful'! 
I love my precious sons. 
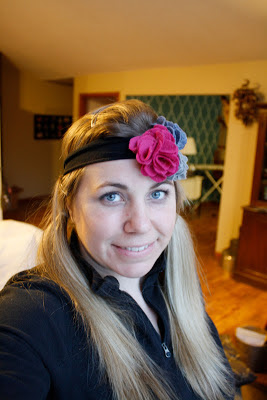
Oh and by the way, I made this headband out of a t-shirt sleeve and some felt.  What do you think?  I usually wear it a little differently, but it is a great way to re-purpose the sleeves of old t-shirts.  Especially if you used the bodies already to make a t-shirt scarf! It's a win/win. I bet you could even make the flowers out of t-shirt material.  Oh man, stop me now! I'm getting giddy with the thought!
Enjoy your life,
Jana


Pin It

Saturday, March 9, 2013

Tear Mender

Here's an amazing product that I just have to tell you about. 
Tear Mender. 
It mends tears. Not to be confused with tears. 
Oh don't you love the English language?
Any way, it mends things without having to sew them!  Which means it can mend those holes that are in the hard to reach places! 
With 3 boys and a husband who works construction, I have ample opportunity to use this product.  It has helped save my sanity when trying to eek a little more life out of H.H.'s work jeans.  I mean really, how do they get holes in some of those places anyhow?  It isn't very easy to get a sewing machine in a pant leg and we all know that those iron on patches are basically worthless. 


The other day I had the perfect opportunity to use Tear Mender once again!  Whilst visiting a friend, one of my sons managed to snag his jeans on something in the house and created a big ole tear. Don't worry, there were no tears. (hee, hee)
Did you ever notice how kids only seem to wreck their good clothes? Anyway, I didn't want to toss the jeans because they are relatively new and I have one more son who should be able to wear them. I knew that sewing a patch on wouldn't look right, so I got out the Tear Mender! 
I used it to glue two pieces of old denim on the back side of the jeans. 
Like this:


Once it dried, I turned the pant leg right side out 
and it looked like this:


Nice and tidy. However, because they're my sons good jeans and I was hoping to get some more use out of them for that purpose, I decided to dress them up a little bit.  Now it did cross my mind to put a Monster patch on these.  I know he probably would have liked it, but I decided on something a little more subtle, yet hopefully stylish enough to make it look like it was done on purpose. 


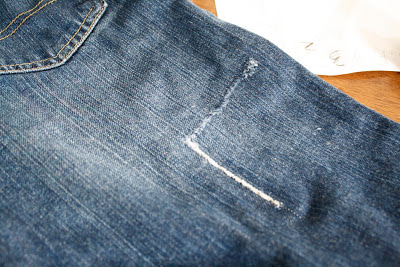
I broke out the embroidery floss and needle to do a little bit of a hand stitched accent. I decided to make it look a little monster-esque by using x stitches like a monster scar or something like that.


Then, to pull it all together I added some stitches on places that didn't really need it on the back and front of his jeans.  


I'm happy with the final result.  He has worn them now that they have been patched and they look cute.  You almost don't notice the place where the jeans were torn and the stitching looks intentional. We've even gotten a compliment or two on the 'look'.
  What I like about the Tear Mender is that it stays supple through many washes. It also doesn't seep through the denim, so as long as you are careful when applying it, you never see it. It is supple enough not to be scratchy either. I actually haven't had a pair of pants I've repaired outlast the Tear Mender yet. It just keeps hanging in there. It's amazing stuff that will change your life.  And it'll save you some $$ since you won't have to buy new clothes so frequently.
I also just used it to repair the boys snow pants. Now I need to figure out how to use it to mend H.H's socks.  He pokes holes through all the toes! 
I bought my bottle of Tear Mender at Fleet Farm in the 'work pants' section. Go figure.
 My bottle is about empty so I better hurry up and get a new one before you all rush out and buy one for yourselves.  
You're going to want to! 

(*disclosure: I was not paid or compensated in any way for the review on this product.  I just really happen to like it and wanted to share it with you.)

Pin It