Showing posts with label decorating. Show all posts

Thursday, August 11, 2016

Why Home Improvement Projects are Pointless While Raising Boys

Is there any better way to waste a perfectly precious rainy day than to patch the walls of the stairway and hall that your sweet angel-baby sons use on a daily basis? 
No. 
There is not. 
You guys, there should be special wall substances for parents with boys because I am here to tell you, dry wall does not cut it. 
Nope. Not a bit. 
Drywall has an amazing capacity for dings and dents, it scrapes and nicks, and then of course there is also the chipped paint. 

We have lived in this house for approximately 8 1/2 years.
In that amount of time my 3 boys (and their cousins and friends and quite possibly there father...) have managed to make approximately 78,005 dents and holes in the drywall of what we will now refer to as the Spackle grave yard. 
I am dead serious.
It's that bad.

The good news is, there are many dents and holes with a precious memory attached to it. 
Like the time the boys were practicing there Ninja Warrior wall climbing skills and one of them slipped and left a dent in the wall with their head. Or the fact that a loving grandparent gifted one of the boys with a dart board for their birthday and even though they are plastic tipped darts, and even thought the dart board was placed in front of a mammoth sized bulletin board, there are now no less than 7,293 small holes in the walls around said dart board (there could be a reason we never replaced those darts as they 'mysteriously' disappeared). 
I am patching holes and dents that have no explanation whatsoever. 
How, pray tell, do you get a perfectly circular dent in the wall the size of a $0.50 cent piece 2 inches off the floor in a corner? 
And what exactly is happening in this hall and stairs (besides Ninja Warrior training) that could possibly create all of these holes and dents? 

I have a few ideas.... 
Match box car races, sliding down the stairs on a plastic mattress into a pile of pillows,  sword fights (sometimes with real swords), running, throwing all manner of objects (let's be honest, there are almost continuous projectiles flying through this hallway), wrestling, and all manner of childhood mayhem. 
Also, when you are a home schooling family, and you buy your child a mini catapult and a mini ballista because you are learning about medievil times in history, it may just have an adverse effect on the walls of your home. Maybe. 
Did I tell you there is no drywall mud left on any of the outside corners? We are down to that pretty metal strip on every one. 
Every. One.

I know, I know, it's just boys being boys, having fun and making memories. They don't mean it. They are not trying to tear the house down around you as you sit on the couch trying to sneak in another cup of chai tea and read that book that's been collecting dust for weeks now. 
It isn't their fault that their mother is her own special kind of crazy and thought that it was time to repaint the white walls that haven't been painted since before her family moved into this home. 
Although, can the walls really be considered white anymore? Since the hand rails were torn from the wall because of boys hanging on for dear life as they run around the corner, the walls are actually a streaked and muddy brownish grey, but only from about 3 ft high and down. 
It's my own special kind of wainscoting. 
I call it Fingerprints and Boogers. 
I think instead of repainting we will just cover the walls in corrugated steel. The rustic farmhouse look is 'in' now. We live in the country, near a farm. So it could be a good look for us. 
Do I hear someone say ship-lap?
Or for a cheaper option, we could re-purpose some of that old wood paneling they like to put in trailer houses. 
That stuff is virtually indestructible. 
There has to be a creative and durable solution. 
Because parents, I just spent the last hour sweating in the 80 degree humidity of our upstairs hallway, patching 78,005 dents and holes in the walls, 
and there is a light bulb burned out in the hallway fixture..... 

How many more dents will there be when I get around to changing that bulb? 
Glory, maybe we will just leave it burnt out and go with 'mood lighting'. We can just wait to repaint when the boys move out. 


Pin It

Friday, August 7, 2015

Book Shelf Make Over with Removable Decorative Back


I recently completed a book shelf makeover for my master bedroom remodel (which is still in progress, 3 weeks later). This particular book shelf was inherited from my MIL. It has currently been serving as Hunky Hubby's night stand. 
It is a solid wood shelf with a laminate top.
Of course I forgot to take a good 'before' photo. However, you can make it out in the grainy photo below. 
It was a nice sturdy shelf, but there was nothing remarkable about it. Essentially, it just didn't go along with our new look for our bedroom. So, it was time to make it over.


I began by sanding the laminate top slightly to rough it up. 
Because of the top, I chose to use chalk paint on this project.


Chalk paint does a good job of adhering to just about any surface.


After two coats of paint on most areas, 3 on the top, I distressed the shelf with some sand paper. I wanted it to have a shabby chic look. Then, I sealed it all with a polyurethane finish. 
I had used the wax that is usually recommended on chalk paint on a previous project. So far I am unimpressed with it. It seems to collect all the dust and dirt even after being buffed. I wanted a more durable finish on this shelf, so poly it is. 
I do think that the poly slightly yellowed the paint color, even though it said it wasn't supposed to. It isn't enough that most people would really notice though.


I left the back of the shelf unpainted because I wanted to cover it with something decorative. However, I change my mind a lot so I also wanted it to be something that would be able to be removed. I decided to wrap some foam core boards that I had picked up at the dollar store with fabric. I measured the space at the back of the shelves and cut my boards accordingly.


For my fabric, I decided to up-cycle a cute scarf that was hanging in my closet. It had the right color scheme and pattern. 


I wrapped each board in the fabric and used duct tape to secure it. 
In hind sight, I would not use this type of fabric again simply because it was very stretchy.


When that was done, I used duct tape loops on the back of each board to adhere it to the back of the shelf.


I am really pleased with the final result. I know the fabric isn't completely straight (I blame that stretchy quality of the fabric I was talking about earlier), however because its the back of the shelf, I'm not really concerned about it. It will mostly be covered up.


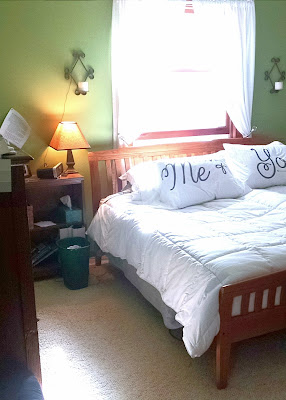
Here is a view of the shelf in our space, ready for use. I included all of the things my husband likes to keep on his bedside table. Even the ugly alarm clock. I get a little irritated when you see a great project in someone's space that is styled in a very unrealistic way. Everything in our home needs to first be functional and then be stylish. 
This shelf is something that will be used daily. My husband needs his alarm clock, so it's a part of the shelf. However, I was able to hide the ever present kleenex box with a cute little wooden crate from TJ Maxx. The lamp is also from TJ Maxx. Everything else is either so old I don't remember where it came from or it's a personally made item. Like that cute little plane my son painted for his Daddy on Father's Day. Presh. 


Hopefully this little project inspires you to make over a drab piece of furniture in your home. I enjoy giving new life to things. This tired wooden shelf now looks updated and fresh. Which is kinda funny considering I distressed it! 


Pin It

Thursday, December 19, 2013

Did Someone Say Cookie?

The Advent made me do it.
Honestly it wasn't my idea to have 10 kids decorate Christmas cookies. 
With sprinkles.
That's right, sprinkles.
But, the Advent calendar said to invite friends over for a Christmas tea.  Well, since kids don't typically drink tea (I blame it on us not being English), I thought we probably needed to have an activity. 
What can you do with kids that is fun and festive?
Well, decorate cookies of course!


So the day before all the friends were to come over I whipped up a couple batches of cutout cookies.  We like ginger bread and sugar in this house. I went on Pinterest to find some new recipe's. I am always looking for that perfect one that will become the traditional holiday recipe. 
You can find the recipe for the sugar cookies here.  I really like this recipe.  The dough was really easy to work with, rolled out well, baked well, and tasted good! I added a tsp of almond extract to the dough for a little added flavor.  I would definitely use this recipe again.
The ginger bread recipe can be found here.  Hunky Hubby is the Ginger bread connoisseur around this house.  He gives this recipe a thumbs up.  It also was very easy to work with and roll out. 
But this story isn't really about the cookies.  It's about the decorating! 
Frosting is always a challenge.  I really like to pipe the frosting on the cookies.  It gives you more control and enables more elaborate designs.  So, I thought we'd pipe the frosting.  
However, I forgot to give the kids a class on how to hold the frosting bags.  After all, when I asked them if they knew what they were doing they all said that they knew how to pipe frosting! Well, we ended up with a few messes like this:


In case you were wondering, the frosting is not supposed to be oozing out the top like that.  One of the bags actually popped and oozed 'cookie monster' blue frosting all over the plate Wyat was decorating his cookies on.  Thanks to the Mommas that were here, we got the messes cleaned up and decided to ditch the piping method and just let the kids have at it with butter knives.


There was much merry making and I even heard a kid or two say "I'm never going to forget this!" Does it matter if they said it after the frosting explosion? 
Cookies were frosted, sprinkled, and eaten.  I even offered them tea! They had hot cocoa instead.


These girls were cookie decorating diva's.  They decorated at least 2 dozen cookies apiece.  I gotta get me a couple girls! 
My sons only decorated enough cookies to eat before they went outside to play. 


And the results of all that frosting and sprinkling? 
Beautiful, creative, cookie masterpieces.


Now now, I don't want to discount the boys in this group.  They did a fine job too. 
One of them came back inside and started decorating again, sprinkling away to his hearts content.  In fact it's hard to find the cookie underneath all those sprinkles! 


It really was a fun time.  
The kids had fun, which was my goal, and the moms had fun, even with the messes. 


My only regret is that we couldn't have all our friends over to decorate cookies.  
But come on people, I am not a saint!
Didn't you hear me say sprinkles! 
(did you know dogs don't lick sprinkles up off the floor? How annoying!)


We were able to send plenty of cookies home with our friends.  And we still have plenty of cookies left to eat! I have a couple of volunteers to help with that. 


We just might have to make this a holiday tradition.  As long as I mentally prepared for the chaos and mess before hand, I was able to handle everything that came our way.  Although, I wouldn't have wanted to do it without the help of my fellow moms. 

Maybe you would like to host a cookie decorating party of your own?  It doesn't take much, just some cookies, frosting, and friends. 
Merry Christmas!!


Pin It

Tuesday, June 11, 2013

Dish Soap Stand {a tutorial}

                       I found this fun idea on Pinterest.  


I loved it and wanted to rush right out and buy all the pieces to make it that minute. But I live 1 1/2 hours from the nearest Target/TJ Maxx/ or any other cool store. So in an effort to be thrifty, I spent the next year looking for the perfect candle stick.  I had found one last summer, but alas, it came as a set and I liked them too much to tear them apart.  So, patiently waiting and keeping my eyes open, I finally found one at a rummage sale with my mom and sister this past weekend.  It did come in a set of three, but I convinced my mom that she only needed two candle sticks to be happy.  She wasn't sure she believed me but I convinced her that I needed that single, solitary candle stick to make my life complete.  
The best part though?  The original owner of those candle sticks was selling the whole 3 piece set for 1.00!  I actually had to look twice at the sticker, I couldn't believe it! 
That's what I call a super score!
I got my super cute plate from TJ Maxx of course. 

Here is all you need: 
1-candle stick
1-cute plate
1-hot glue gun

Just make sure that the top of your candle stick is smaller than the bottom of your plate of course! 


Heat up your hot glue gun and slap some hot glue on that candle stick.


Turn your cute plate upside down and stick the candle stick in the center of it. Make sure you work quickly so that the glue doesn't cool down and harden before you get it on the plate. 


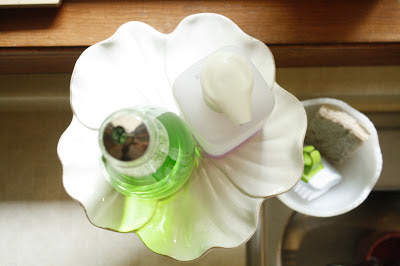
And voile! You have a beautiful stand to add style and beauty to your kitchen sink.  Which frankly could use a little pick-me-up, at least in my house. 


All you need to do is add your dish soap and hand soap to your lovely new stand.  I put my dish soap in a glass decanter that I picked up from TJ Maxx for $4.00. That way it looks even prettier.  I may have to find a pretty bottle for the hand soap next.


I hope this inspires you to make your space a little less ordinary.  Beauty and creativity don't have to be 
expensive or difficult! 
Enjoy!
Jana
Pin It

Thursday, December 20, 2012

Free & Festive Decorations


Want to add a little Christmas cheer to your home? I've got an idea to share that didn't cost me a dime.  I was able to use all materials I had around the house and in the yard.
Now of course this isn't an origional idea.  I saw similar arrangements in some pictures I saw on the internet while researching Christmas decorations. I'm sure I've got something pinned on my Holiday Happiness Pinterest board if you are interested.
Okay, let's get started. They were really simple to put together.
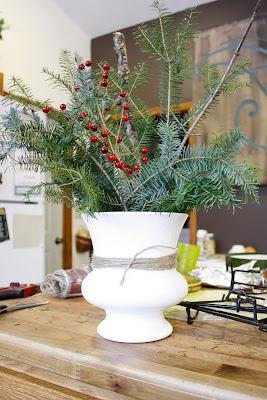
First of all, I braved the frozen tundra of our back yard to harvest a few pine boughs off of some of the trees in our back yard.  They needed a little pruning anyway.


Then I gathered up a few of the vases that I had decorating the top of my kitchen cabinets.
I also grabbed some holiday colored ribbon and some twine.


Snip the boughs to appropriate lengths. With a little careful placement and the addition of some fake red berries, you have a nice holiday styled arrangement.


I made three different arrangements to place around the kitchen and dining area. 
They pack a big holiday punch for a tiny bit of cost and effort.
It's not to late to make one for your home.
They would also make a nice hostess gift for some of these holiday parties you'll be attending.  


Add a little jolly to your holiday with these natural arrangements.
Happy decorating!

Pin It