Showing posts with label DIY. Show all posts

Friday, August 7, 2015

Book Shelf Make Over with Removable Decorative Back


I recently completed a book shelf makeover for my master bedroom remodel (which is still in progress, 3 weeks later). This particular book shelf was inherited from my MIL. It has currently been serving as Hunky Hubby's night stand. 
It is a solid wood shelf with a laminate top.
Of course I forgot to take a good 'before' photo. However, you can make it out in the grainy photo below. 
It was a nice sturdy shelf, but there was nothing remarkable about it. Essentially, it just didn't go along with our new look for our bedroom. So, it was time to make it over.


I began by sanding the laminate top slightly to rough it up. 
Because of the top, I chose to use chalk paint on this project.


Chalk paint does a good job of adhering to just about any surface.


After two coats of paint on most areas, 3 on the top, I distressed the shelf with some sand paper. I wanted it to have a shabby chic look. Then, I sealed it all with a polyurethane finish. 
I had used the wax that is usually recommended on chalk paint on a previous project. So far I am unimpressed with it. It seems to collect all the dust and dirt even after being buffed. I wanted a more durable finish on this shelf, so poly it is. 
I do think that the poly slightly yellowed the paint color, even though it said it wasn't supposed to. It isn't enough that most people would really notice though.


I left the back of the shelf unpainted because I wanted to cover it with something decorative. However, I change my mind a lot so I also wanted it to be something that would be able to be removed. I decided to wrap some foam core boards that I had picked up at the dollar store with fabric. I measured the space at the back of the shelves and cut my boards accordingly.


For my fabric, I decided to up-cycle a cute scarf that was hanging in my closet. It had the right color scheme and pattern. 


I wrapped each board in the fabric and used duct tape to secure it. 
In hind sight, I would not use this type of fabric again simply because it was very stretchy.


When that was done, I used duct tape loops on the back of each board to adhere it to the back of the shelf.


I am really pleased with the final result. I know the fabric isn't completely straight (I blame that stretchy quality of the fabric I was talking about earlier), however because its the back of the shelf, I'm not really concerned about it. It will mostly be covered up.


Here is a view of the shelf in our space, ready for use. I included all of the things my husband likes to keep on his bedside table. Even the ugly alarm clock. I get a little irritated when you see a great project in someone's space that is styled in a very unrealistic way. Everything in our home needs to first be functional and then be stylish. 
This shelf is something that will be used daily. My husband needs his alarm clock, so it's a part of the shelf. However, I was able to hide the ever present kleenex box with a cute little wooden crate from TJ Maxx. The lamp is also from TJ Maxx. Everything else is either so old I don't remember where it came from or it's a personally made item. Like that cute little plane my son painted for his Daddy on Father's Day. Presh. 


Hopefully this little project inspires you to make over a drab piece of furniture in your home. I enjoy giving new life to things. This tired wooden shelf now looks updated and fresh. Which is kinda funny considering I distressed it! 


Pin It

Saturday, April 25, 2015

Mug Rug Tutorial

Mug Rug: A cute mat to place your mug and muffin on. 
Enhances the morning coffee experience and protects your coffee table in a fashionable way.


That's not the dictionary definition, in case you were wondering. It's my own version. 

Have you priced coasters lately? They can be expensive. And ugly. I had been looking for some coaster ideas to make at home and ran across the mug rug idea. It was love at first sight. After all, fabric is so pretty, it's almost an art form itself. And sewing my own mug rug allows me to use cute fabrics that match my decor, or just make me happy. Plus an extra bonus is that 'mug rug' is way more fun to say than 'coaster', right?
If you are an intermediate sewer, you can make some cute mug rugs for yourself. 
But be careful, when your friends see them, they are going to want some too. 

You will need:
Fabric scraps
Interfacing
thread
sewing machine
rotary cuter
cutting mat and ruler

I used some pretty stiff interfacing because  got it for free from my sister. It allows the mug rug to lay nice and flat which I really like. There can't be any wobbly coffee mugs near me. I'm an over-filler.

Here is the one I used:


You are going to cut your interfacing 6" x 7" 
(you can really make these any size you want, this is just what I did)

Here we are; nice neat rectangles.


Next, you will want to go to your fabric stash. Or maybe you'll pick your fabrics first and then cut your interfacing. Whatever works for you. I like to let everyone be an individual.


I picked out a few scraps I liked. I decided to just piece strips together to make the top. 


I use one solid piece for the back. If you feel ambitious, you could piece the back too. (I wouldn't do that myself unless I was feeling a little overly ambitious. That rarely happens.)


Sorry, no measurements for you here because there is no real pattern. Obviously you want your finished size to be the same size as your interfacing which is 6 x 7. I pieced my fabric together randomly and made sure it was at least too big so I could trim it down.


When you are done, you will iron your face and back onto your fusible fleece. I like this because it keeps everything from shifting during the binding process. 


Trim off any excess fabric.


And, voile! You have an interfacing sandwich


Next, we are going to make our binding. 
This is the most complicated part of this project. But a binding really finishes off a project and adds just the right amount of pizzazz. 
That's right, I said pizzazz. 


You need to cut 2 1/4" strips. Enough to go all the way around your project.


Here's how you join two strips together: lay them down right sides together at the ends, it helps to over lap a little like in the upper picture.


Then you will sew a diagonal line from the top corner of the bottom fabric to the lower corner of the top fabric. I always have to make sure of which way I am supposed to sew BEFORE I begin sewing. I've done it wrong too many times.


When you are done you will have a little flag. Trim that off about 1/4" from your seam.


Press the seam open. Now your strips are joined together!


Cut one end at an angle, fold over 1/4" and press


Now take that long strip of fabric and fold it all in half, pressing as you go.


Your are going to lay the pointy end of your binding strip on the top of your mug rug about an inch down on one side. Put the raw edge of the binding strip fabric on the outside of your mug rug project. Give your self about 2 inches from the top of your binding strip before you start sewing. Sew a quarter inch in from the raw edge of your binding strip. Stop sewing a 1/4" from the end of the side you are sewing.


Fold that binding fabric up off of the mug rug.


Then fold it back over the top of that fold you just made. (This is where I hope the pictures are explaining this process better than my words.)


Continue sewing in this manner all the way around your mug rug until you get to the beginning.


The end of your binding strip is going to tuck inside of the beginning of your binding strip.


See, just like that. Then you sew it down. 


Ta! Da! That was a big accomplishment.


After taking a moment to admire your hard work and mostly straight stitching, it's time to move on the the next step.


Peel that binding back and press it open. 


It will look a little like a hot dog basket. But I would't go putting any hot dogs in it.


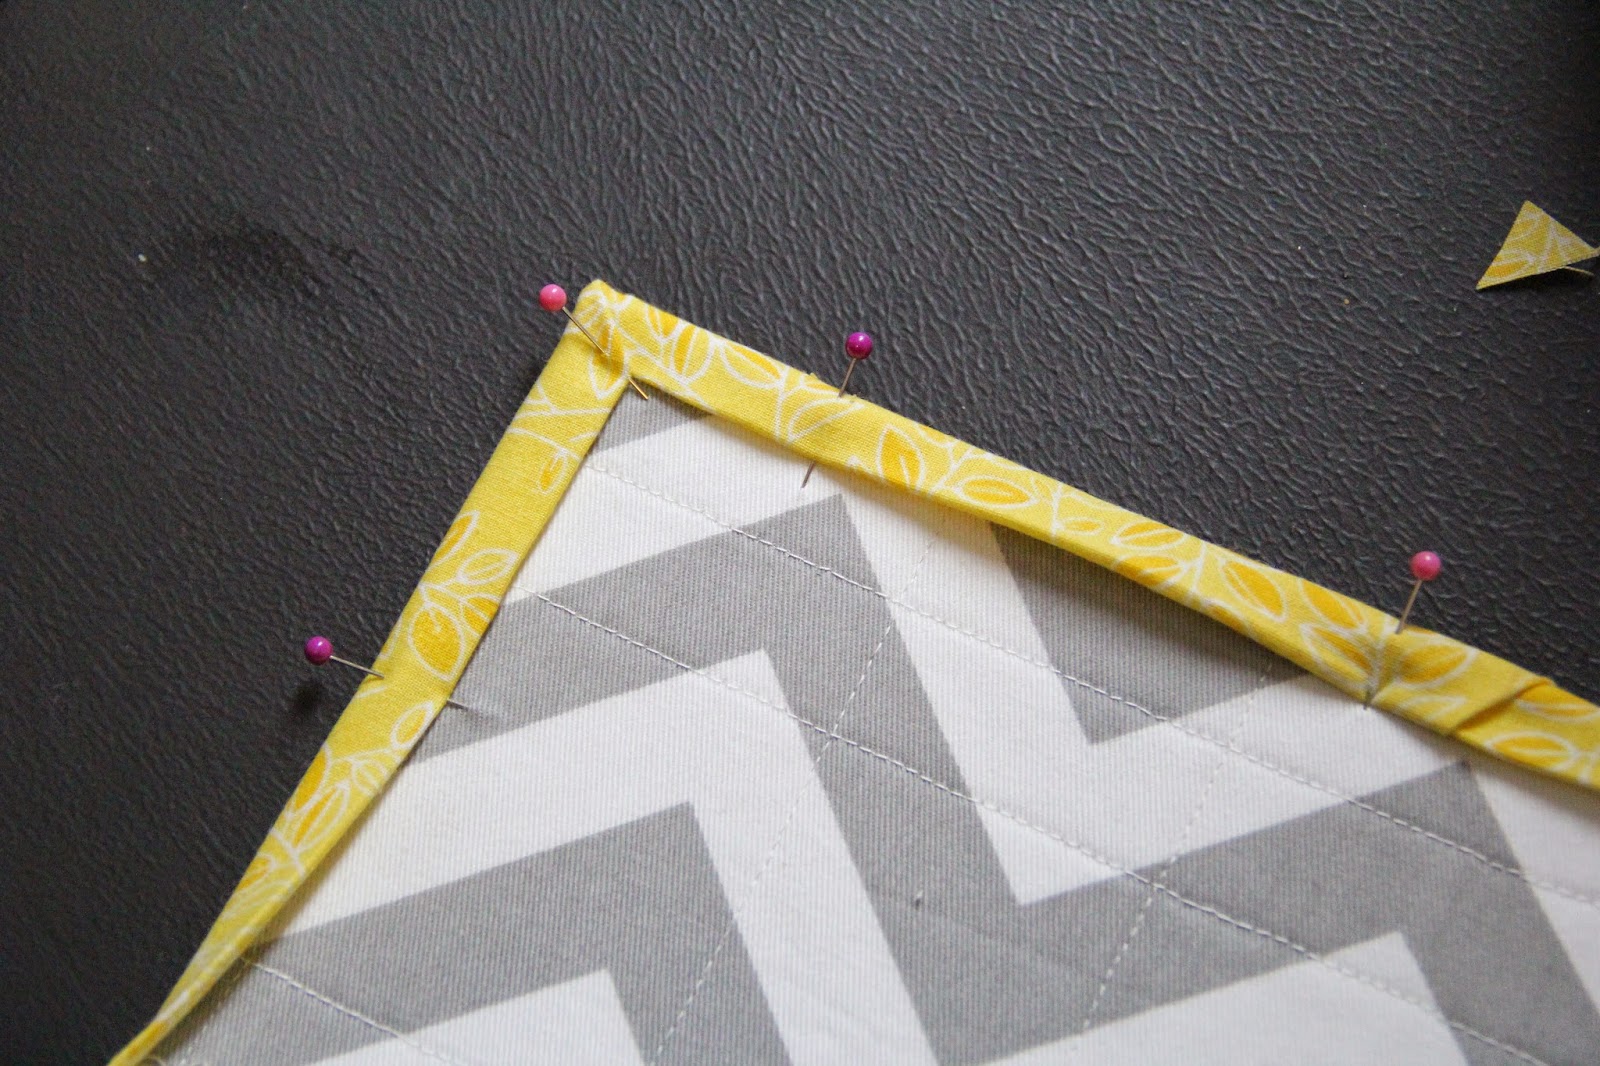
Now you have to fold the binding around to the back side and pin, pin, pin. Miter those corners so they look nice.


I admit, I hate pinning. But there really is no other way to get this done right. 


Now flip that bad boy over to the top and you are going to stitch in the ditch all the way around.


At this point I pray that my measurements weren't off and that I pinned well enough. It's important that you catch the binding on the back side all the way around. This isn't as neat of a way to finish off a binding as hand stitching it. But who has time for that? Not this girl.


You did it! Stand back in amazement at what a beautiful thing you have just created. Mug rugs are fun and pretty. They are also more effective at soaking up drips than most coasters I have seen. 

Your morning mug will thank you for making this. 


Pin It

Monday, April 28, 2014

DIY - Slow Feeder Dog Dish


This dog is a sweet little girl who loves three things in life.
Her ball, her people, and her food.


We didn't raise Jinx from a puppy and so we did not get a chance to help her develop good eating habits. 
This girls can down her dish of doggy kibble in less than 30 seconds.
This results in the most noxious gas emanating from a peacefully slumbering pooch that you have ever smelled.
She can clear a room, people.
So I hopped online to do a little research on what could be done about doggy gas. I learned 2 helpful things;
elevate her food, and get a dish that will cause her to eat slower.
When I looked online for these fabulous dog dishes, I found that they could run anywhere between $10 and $25.
The cheaper ones are made out of plastic.
I didn't like the plastic versions and the stainless steel ones were expensive. I got to thinking about it and thought that I could come up with my own solution for much cheaper.
My solution cost me less than $5.
Want to make your own?
This is what you will need:
2 stainless steel bowls.


These were purchased at our local hardware/home improvement store. The little one cost less than a dollar and the large one cost less than $4.

You will also need some silicone sealant.


Now because Hunky Hubby is a carpenter, we happened to already have a tube of silicone. However you should be able to pick up a tube for around a buck. You could also look for a silicone glue like E6000 in the crafts section of your nearest big box store.
Just a little warning: you will not come close to using all the silicone.


Turn the little bowl upside down and glue it into the bottom of the large bowl.
Let dry.
Boom!
You now have your very own slow feeder dog bowl.
Want to see it in action?
I know you do.


Miss Piggy now has to take smaller bites in order to eat around the small dish in the middle. 
I could actually hear her chewing!
Now, because I have a Lab, I wanted to use the large dog dish so I would have enough space for her to get her muzzle in between the sides of the dishes. I also wanted to be able to add enough food.
These sizes worked great for us.
The next step is for H.H. to build a stand for the dog dish to sit inside so it can't be knocked off the overturned laundry basket it was set on.
Do you want to hear the best news?
These two techniques have definitely slowed down Jinx's food gulping. It has also seriously reduced the amount of stinky flatulence that emit from her!
This is a win-win, people.
Cheap and easy project + less stinky dog.

Guess what?
Our Jinx is going to be a mommy!
If you or anyone you know are interested in a labradoodle puppy, stay tuned for future updates and pictures. They are due in a little over 2 weeks.


Pin It