Yes, it's that time of year again.
The time of year when you are hauling in the abundance from the garden or the Farmer's Market and wondering what in the world you are going to do with it all.
If you are anything like me, you are also wondering how you will possibly get it all done before it spoils. Meanwhile continuing to take care of all of the other every day tasks that are calling for your attention.
You know, minor details like - the kids?
Or in our house, home schooling those kids?
Nothing major.
It's just their educational future at stake.
Anyway, a couple years ago I finally invested in a hot water canning pot and all the accessories. Which all together probably came to less than $40. I'm pretty sure it has paid for itself already in the money I have saved in the food I was able to put up (that's preserving lingo).
Which results in not having to buy it at the store! Cha-ching!
Honestly, I was completely intimidated by the idea of canning.
I thought you had to do everything with a pressure cooker.
That piece of kitchen equipment scares me. Too much steam and rattling and opportunity to blow up the kitchen.
Then I found out that there are many things you could preserve simply by putting them in a hot water bath.
I have already proven my kitchen prowess in boiling water, so I thought that I could handle this type of canning.
Turns out I was right.
All you need is a good recipe and the right supplies and hot water bath canning is easy-peasy!
Our family happens to love salsa, like many families do. Did you know it's the 2nd most popular condiment in America?
Don't quote me on that or anything, I think I read it on face book.
I found this recipe on pancake-ninja.blogspot.com (follow the link to find the recipe)
It had all the necessary salsa ingredients with no weird add-ins.
It looked perfect.
Here is the process in pictures.
Because I like visuals.
And because I'm just nice like that.
You're welcome.
Dice your tomatoes and let them drain for a few hours or overnight
Next comes the peppers. This year I used Anaheim peppers because I got them for free from our friends garden.
And because they taste good.
They are sweet, not spicy.
I got smart and used my Pampered Chef food chopper to do all the hard work.
Because we all know it doesn't matter what the salsa looks like, it's what it tastes like.
Dump those bad boys on top of the tomatoes.
Next comes the onions.
These were also free from my friends garden.
Unfortunately, I was also crying my eyes out, even with using the food chopper. I haven't cried that hard since watching Tarzan.
And yes, I mean the cartoon version.
Next comes the garlic.
I used my garlic press from IKEA to help me out. If you wanted to, you could use the pre-minced garlic that comes in a jar.
But I like it fresh. Mmmm.
Next, add a little sugar...
And a little salt.
I have never understood why you sugar something and then salt it.
It's perplexing.
Add a bit of cumin.
Which just happens to be one of my favorite spices.
Then cilantro.
I always add a little extra.
You can never have too much cilantro.
Never.
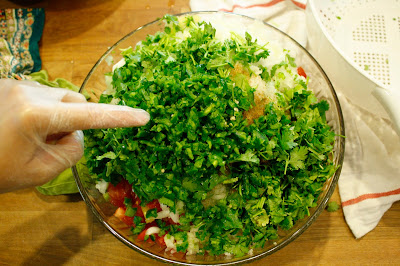
Finally, you have to add the jalapenos.
I learned a good lesson last year.
Now I always wear gloves when cutting up these hot peppers.
Jalapeno oils will leave your fingers burning for hours!
Did I mention that you are going to need a big bowl?
You will need a big bowl.
My friend also had these cute little peppers growing outside her door. I have no idea what they are, but I know they are hot because Hunky Hubby bit one and said it was hot. H.H. never thinks it's hot.
Which means these are actually small balls of inferno disguised as peppers. So I chopped all of these up and added them too a few jars of salsa to make Smokin' Hot Salsa!
Just for Hunky Hubby.
Add a 12 oz can of tomato paste,
and stir it all together.
Yum.
You will need some lemon juice. Actually, a lot of lemon juice.
You can use fresh lemons if you are up for a lot of squeezing.
I'm not. So the bottled stuff it is.
Add a few table spoons of lemon juice to the bottom of your jars,
Get out your handy-dandy canning funnel,
and fill those bad boys up with that good stuff you just mixed up.
Make sure you get all the air pockets out of the jar. You could use a butter knife for this, but this handy tool came with the canning kit I bought so I might as well use it.
Wipe the rims off with a damp towel.
This is an important step so don't forget it like I sometimes do.
Put your presoaked lids on,
add the rings, only tightening them finger tip tight.
They need to be able to breathe a little bit.
Now you add them to your big ol' pot of boiling water.
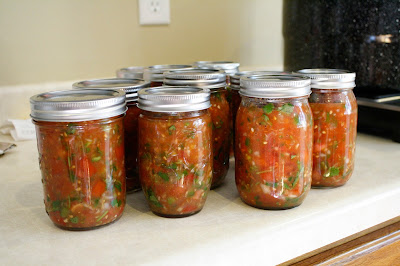
After about 30 minutes you remove them and set them on a towel to cool down. You should begin to hear some popping lids in a little bit.
And there you have it!
All the steps to canning your own salsa that is delicious and nutritious.
That wasn't so hard, was it?
Enjoy!
FRESH SALSA
makes about 8 pints, (or can be done the easy refrigerator way)
ingredients:
- 3 quarts tomatoes, chopped and left to drain in a colander several hours or overnight in a cool place; the strained juice can be poured off into a jar and seasoned --- tomato juice!
- 3 large bell peppers, seeded and chopped
- 4 large onions, chopped
- 6 cloves garlic, chopped
- 1/4 cup sugar or honey
- 3 Tablespoons sea salt
- 1/2 to 1 cup cilantro, chopped
- 1 teaspoon ground cumin
- 4 to 6 jalapenos, chopped, with seeds for added heat
- a 12 oz can of tomato paste
- 6 to 7 lemons, juiced; and more bottled lemon juice if you run out of juice; this is not mixed into the other ingredients, but put into the jars before filling
Mix well in a large bowl
Prepare jars and lids
1.for raw pack:
measure 3 Tablespoons of lemon juice into prepared jars, then fill with mixture, leaving 1/2" headspace, wipe rims and cover with prepared lids and bands
process in hot water bath for 30 to 40 minutes


