Friday, August 7, 2015

Book Shelf Make Over with Removable Decorative Back


I recently completed a book shelf makeover for my master bedroom remodel (which is still in progress, 3 weeks later). This particular book shelf was inherited from my MIL. It has currently been serving as Hunky Hubby's night stand. 
It is a solid wood shelf with a laminate top.
Of course I forgot to take a good 'before' photo. However, you can make it out in the grainy photo below. 
It was a nice sturdy shelf, but there was nothing remarkable about it. Essentially, it just didn't go along with our new look for our bedroom. So, it was time to make it over.


I began by sanding the laminate top slightly to rough it up. 
Because of the top, I chose to use chalk paint on this project.


Chalk paint does a good job of adhering to just about any surface.


After two coats of paint on most areas, 3 on the top, I distressed the shelf with some sand paper. I wanted it to have a shabby chic look. Then, I sealed it all with a polyurethane finish. 
I had used the wax that is usually recommended on chalk paint on a previous project. So far I am unimpressed with it. It seems to collect all the dust and dirt even after being buffed. I wanted a more durable finish on this shelf, so poly it is. 
I do think that the poly slightly yellowed the paint color, even though it said it wasn't supposed to. It isn't enough that most people would really notice though.


I left the back of the shelf unpainted because I wanted to cover it with something decorative. However, I change my mind a lot so I also wanted it to be something that would be able to be removed. I decided to wrap some foam core boards that I had picked up at the dollar store with fabric. I measured the space at the back of the shelves and cut my boards accordingly.


For my fabric, I decided to up-cycle a cute scarf that was hanging in my closet. It had the right color scheme and pattern. 


I wrapped each board in the fabric and used duct tape to secure it. 
In hind sight, I would not use this type of fabric again simply because it was very stretchy.


When that was done, I used duct tape loops on the back of each board to adhere it to the back of the shelf.


I am really pleased with the final result. I know the fabric isn't completely straight (I blame that stretchy quality of the fabric I was talking about earlier), however because its the back of the shelf, I'm not really concerned about it. It will mostly be covered up.


Here is a view of the shelf in our space, ready for use. I included all of the things my husband likes to keep on his bedside table. Even the ugly alarm clock. I get a little irritated when you see a great project in someone's space that is styled in a very unrealistic way. Everything in our home needs to first be functional and then be stylish. 
This shelf is something that will be used daily. My husband needs his alarm clock, so it's a part of the shelf. However, I was able to hide the ever present kleenex box with a cute little wooden crate from TJ Maxx. The lamp is also from TJ Maxx. Everything else is either so old I don't remember where it came from or it's a personally made item. Like that cute little plane my son painted for his Daddy on Father's Day. Presh. 


Hopefully this little project inspires you to make over a drab piece of furniture in your home. I enjoy giving new life to things. This tired wooden shelf now looks updated and fresh. Which is kinda funny considering I distressed it! 


Pin It

Monday, June 29, 2015

Repurposed on Purpose - Bandanna Napkins


Are you looking for a fun and easy way to dress up your summer dinner table? What about an easy and fun napkin solution? 
Have you ever thought about using Bandannas? 


Last summer my mom purchased about 12 bandannas for me in bright colors to use as napkins. They are great! 
The size is perfect, they wash up well (make sure you buy the 100% cotton ones), and they do a great job of cleaning hands and faces. They are also pretty inexpensive. We found these for less than $1 a piece. Bandannas can be found in a wide variety of colors. I liked these bright ones for summer. But this year I was thinking of getting red, white, and blue for the July 4th holiday.

You can find Bandannas at a variety of stores, Hobby Lobby, Wal-Mart, etc... They are pretty easy to come by. 

I stopped using paper napkins a couple of years ago and I don't regret it. We still keep paper towels around, but I really like using cloth napkins at our dinner table.


Adding a few cloths to the laundry is no big deal and they do a much better job of cleaning up certain messes than paper napkins do. 
Have you ever tried wiping grilled chicken off your hands with a paper napkin and ended up with more napkin on your hands than chicken on the napkin? I have. 


I like to fold our napkin bandannas up and keep them in a cute basket right in the middle of our table. It makes them readily available for everyone. 
Sometimes, company doesn't know what to do and so we show 'em! Just wipe that barbecue sauce right on that napkin, Mr. You'll be glad you did! 
Cloth napkins last for years and can be reused many times. I like to watch for different ones on clearance and switch them up for the seasons. It is a fun way to dress up your dining room table. 
Plus, I always feel a little fancier using my cloth napkins.
Maybe a little of that fancy feeling will eventually rub off on my man cubs in the form of better table manners. 
Hey, a mom can hope, right?!


Pin It

Saturday, June 27, 2015

How to Remove The Stink From Your Norwex Cloths


 I hosted a Norwex party last year in order to get the dust mopping system that was the hostess benefit that month. I also received some cloths. Norwex makes a microfiber cloth with silver in it that gives it an antimicrobial property. They are nice cloths that I use in my kitchen and I also use a couple to clean my bathrooms. (Don't worry, the bathroom cloths are not used in the kitchen!)
However, even with the antimicrobial property, these rags start to stink after awhile. But don't worry! If this happens to you too and you think your cloths are ruined, they are not! I have a very simple solution for you. 


I hate dishrag stench. It is really unpleasant to grab a dishrag to clean something, only to have it leave your hands stinking! This happens more for me in the summer where the humidity of our area makes it hard to let our dishcloth dry overnight. 
I have found a simple solution to this problem. When I notice my cloths aren't smelling fresh right out of the wash, I simply throw them in a pot and boil them! 


That's right, I boil them. 
Throw those rags in a large pot, fill it with water, and turn it on to boil. 
Do NOT add any detergent. 
Make sure there is enough room for the rags to move around a little. 
Bring that pot to a boil and let it go for 5 to 10 minutes. 
Stir the rags around a little bit every once in awhile.
After time is up turn it off and let everything cool down for a little bit.


After the water cools down a little, you are going to pour off most of the water. This is when you will be unpleasantly surprised at how dirty the water is! After all, I put 'clean' rags in this pot! 
How is the water this brown? 


Next, throw the rags in your washing machine.


Set that machine to 'rinse and spin'. 
Do not worry about washing them again with any detergent. 
When the machine is done cycling, throw them in the dryer and dry like normal. DO NOT USE FABRIC SOFTENER! 
If you have done this in the past, STOP!


Your Norwex cloths should now smell clean!
No more stench! 


Fold those babies up and admire your handy work.
You may need to repeat this process every few months. 
But it's no biggie! You now have a simple solution to a stinky problem.
Some tips to keep your Norwex fresh:
*Do not throw them in the laundry pile wet. Allow them to dry completely first.
*Use a different cloth every day. 
*Don't leave your cloth in a wet heap at the bottom of your sink. Wring it out and hang it by the sink between uses.
*Rinse your cloth well in hot water after each use.
*Don't use fabric softener when laundering

The Norwex enviro cloth is a very tightly woven microfiber cloth. It really grabs the dirt and locks it in. That's why when you boil it, your water gets so dirty, even with clean cloths. Boiling also helps remove detergent build-up on your cloth which can lead to the stink.
Enjoy your cleaning! 

*Disclaimer: I am not a Norwex consultant, nor was I compensated in any way for my opinions. This post is a result of my own usage and research of the Norwex product. 
Pin It

Sunday, May 10, 2015

Your Family In Pictures - A Book Review


Your Family in Pictures by Me Ra Koh
Filled with beautiful photography and 'recipes' for you to take your own pictures, this book is an easy to read instructional guide in family photography. 


With an organized layout and explanations that even the beginning photographer can understand, Me Ra brings her years of photographic expertise to your finger tips. I especially like the photo recipes. They give a sample photo, with the exact exposure used to get the shot, in order that you can more easily replicate it on your own.


I enjoyed the down to earth feeling in the writing of this book and the helpful tips. There are also internet links to Me Ra's you tube videos produced by the Disney Channel. Her passion for capturing the essence of the family dynamic in digital photography is evident all throughout the pages of this book. 
I would recommend this as a good resource for the personal library of any budding photographer. By following the tips in the book, you will no doubt improve your photography skills and capture pictures of your family that will be cherished for years.
You can find your copy on Amazon


* Disclaimer - I recieved a copy of this book for free in exchange for my honest review from Blogging For Books, 

Pin It

Saturday, April 25, 2015

Mug Rug Tutorial

Mug Rug: A cute mat to place your mug and muffin on. 
Enhances the morning coffee experience and protects your coffee table in a fashionable way.


That's not the dictionary definition, in case you were wondering. It's my own version. 

Have you priced coasters lately? They can be expensive. And ugly. I had been looking for some coaster ideas to make at home and ran across the mug rug idea. It was love at first sight. After all, fabric is so pretty, it's almost an art form itself. And sewing my own mug rug allows me to use cute fabrics that match my decor, or just make me happy. Plus an extra bonus is that 'mug rug' is way more fun to say than 'coaster', right?
If you are an intermediate sewer, you can make some cute mug rugs for yourself. 
But be careful, when your friends see them, they are going to want some too. 

You will need:
Fabric scraps
Interfacing
thread
sewing machine
rotary cuter
cutting mat and ruler

I used some pretty stiff interfacing because  got it for free from my sister. It allows the mug rug to lay nice and flat which I really like. There can't be any wobbly coffee mugs near me. I'm an over-filler.

Here is the one I used:


You are going to cut your interfacing 6" x 7" 
(you can really make these any size you want, this is just what I did)

Here we are; nice neat rectangles.


Next, you will want to go to your fabric stash. Or maybe you'll pick your fabrics first and then cut your interfacing. Whatever works for you. I like to let everyone be an individual.


I picked out a few scraps I liked. I decided to just piece strips together to make the top. 


I use one solid piece for the back. If you feel ambitious, you could piece the back too. (I wouldn't do that myself unless I was feeling a little overly ambitious. That rarely happens.)


Sorry, no measurements for you here because there is no real pattern. Obviously you want your finished size to be the same size as your interfacing which is 6 x 7. I pieced my fabric together randomly and made sure it was at least too big so I could trim it down.


When you are done, you will iron your face and back onto your fusible fleece. I like this because it keeps everything from shifting during the binding process. 


Trim off any excess fabric.


And, voile! You have an interfacing sandwich


Next, we are going to make our binding. 
This is the most complicated part of this project. But a binding really finishes off a project and adds just the right amount of pizzazz. 
That's right, I said pizzazz. 


You need to cut 2 1/4" strips. Enough to go all the way around your project.


Here's how you join two strips together: lay them down right sides together at the ends, it helps to over lap a little like in the upper picture.


Then you will sew a diagonal line from the top corner of the bottom fabric to the lower corner of the top fabric. I always have to make sure of which way I am supposed to sew BEFORE I begin sewing. I've done it wrong too many times.


When you are done you will have a little flag. Trim that off about 1/4" from your seam.


Press the seam open. Now your strips are joined together!


Cut one end at an angle, fold over 1/4" and press


Now take that long strip of fabric and fold it all in half, pressing as you go.


Your are going to lay the pointy end of your binding strip on the top of your mug rug about an inch down on one side. Put the raw edge of the binding strip fabric on the outside of your mug rug project. Give your self about 2 inches from the top of your binding strip before you start sewing. Sew a quarter inch in from the raw edge of your binding strip. Stop sewing a 1/4" from the end of the side you are sewing.


Fold that binding fabric up off of the mug rug.


Then fold it back over the top of that fold you just made. (This is where I hope the pictures are explaining this process better than my words.)


Continue sewing in this manner all the way around your mug rug until you get to the beginning.


The end of your binding strip is going to tuck inside of the beginning of your binding strip.


See, just like that. Then you sew it down. 


Ta! Da! That was a big accomplishment.


After taking a moment to admire your hard work and mostly straight stitching, it's time to move on the the next step.


Peel that binding back and press it open. 


It will look a little like a hot dog basket. But I would't go putting any hot dogs in it.


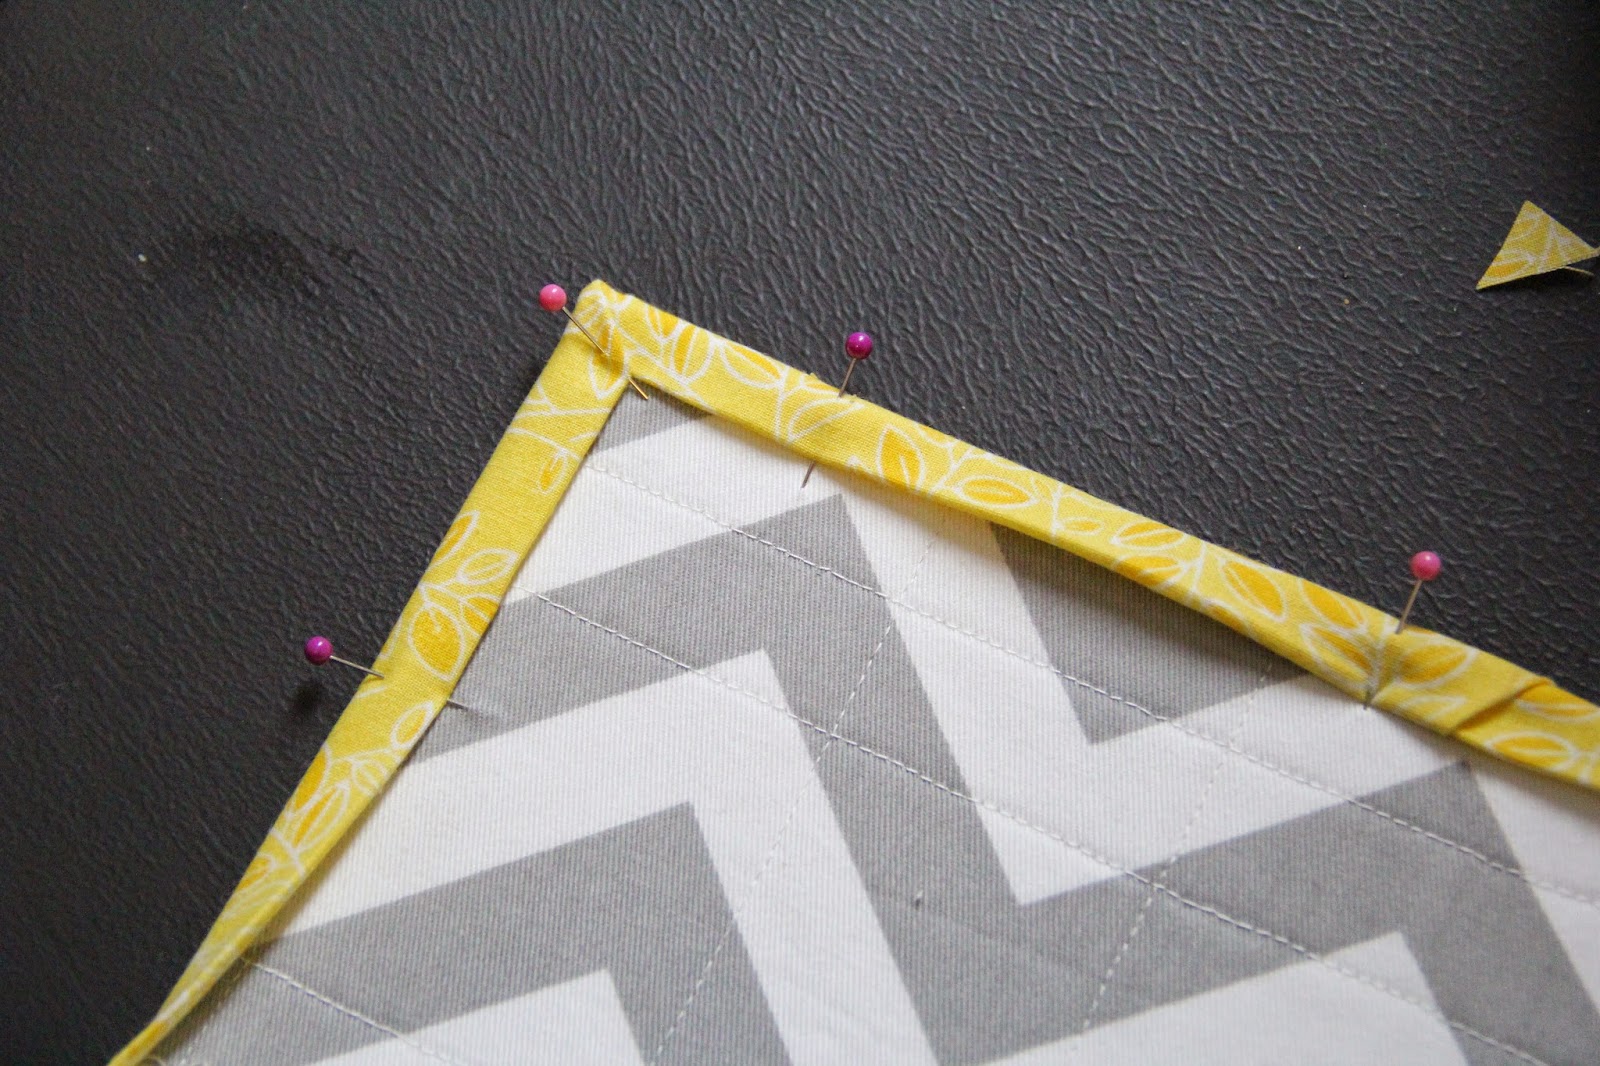
Now you have to fold the binding around to the back side and pin, pin, pin. Miter those corners so they look nice.


I admit, I hate pinning. But there really is no other way to get this done right. 


Now flip that bad boy over to the top and you are going to stitch in the ditch all the way around.


At this point I pray that my measurements weren't off and that I pinned well enough. It's important that you catch the binding on the back side all the way around. This isn't as neat of a way to finish off a binding as hand stitching it. But who has time for that? Not this girl.


You did it! Stand back in amazement at what a beautiful thing you have just created. Mug rugs are fun and pretty. They are also more effective at soaking up drips than most coasters I have seen. 

Your morning mug will thank you for making this. 


Pin It