Showing posts with label crafts. Show all posts

Thursday, December 11, 2014

Christmas Patchwork Pillow Covers

Every year I like to add something new to my Christmas decor. This year, my goal is to make Christmas pillow covers for my couch throw pillows. (This may be more than I can handle in one month. I have a lot of throw pillows. I also can't seem to work on Christmas projects before December. It's a real problem.)
I have seen some fun ideas on Pinterest using old sweaters, but first I wanted to use up some fabric.
I had some leftovers from a previous project that I really liked. 
It has been a long time since I have done any patchwork and I have recently been inspired to do something myself. So I took those leftovers and made a patchwork pillow cover.


I am really happy with how it turned out. 
I cut 4 1/2" squares, used a 1/4" seam allowance, and covered a 20" pillow. I finished it off with a simple envelope back in a coordinating fabric. I was really surprised it all came out okay, because I didn't follow anyone else's pattern. I made it up on my own. That was a super risky move on my part.


I quilted every other square. Although if you look closely, you'll see I missed one!


I really like the patterns and colors and how it came together. 


I have 2 pillows of the same size on my couch. However, I didn't have enough fabric for another patchwork pillow. I decided to make a contrasting pillow. I sewed strips instead of squares of the remaining fabrics together to make the second pillow cover.


Some straight line quilting pulls it all together in a simple and efficient way.


I am happy with the way they turned out. I actually really like that they aren't matchy - matchy but coordinate instead. 


2 down, only about 10 more to go! 


Pin It

Monday, April 29, 2013

DIY Wooden Sign

I was in need of a bridal shower gift.
Of course I looked on Pinterest to find an idea.
I love the rustic wooden signs that people have been making.
So I went to my local handy man, aka, Hunky Hubby, and begged him to help me.
He is so handy with a saw.
He whipped up this fantastic rustic wood sign for me.
I didn't really even have to beg.
That's cause he looooves me.(insert kissy noises here)
Plus, it only took him about 6.8 seconds to whip the whole thing together.
It would have taken me approximately 6.8 years.


The sign was almost beautiful enough by itself.
H.H.'s handy work is that good.
However, I thought it might be nice if the gift came with a little effort from both of us, so I decided it needed a message on it.
Something romantic.
There isn't anything more romantic than the Song Of Solomon, from the Bible.
Have you ever read it?
It's gets pretty steamy if you can read between the lines and understand what those word pictures stand for.
Anyway, I pulled my quote from chapter 6 verse 3.
It says "I am my beloved's and my beloved is mine."
(Swoon)
But I only used the first part.


Otherwise, that's way too much to paint on a little ol' sign.
I researched online how to transfer the lettering from a piece of paper to the wooden sign.
It didn't work.
Probably because my wood was too rough.
So, after going through the process of designing the text on my computer, driving to camp to blow it up on the xerox machine (because I don't know how to do it on my printer), and trying to transfer it to the sign, I ended writing it all by hand with chalk.
Chalk works great because you can paint over it and then wipe off the excess with a wet paper towel after the paint has dried.
I used some brushes with fine tips and some acrylic craft paint I had in my 'stash.
The lettering was still a little bit challenging because of the rough texture of the wood.
In the end, I think it turned out nicely.
I just hope the bride-to-be enjoys it.


What do you think?  
I love hearing your comments.
If I decided to make some of these signs and sell them, what do you think they would be worth?

Don't forget, if you would like these blog posts to show up automatically in your in-box, become a follower. Take a look over in the side bar and you'll see where to type in your e-mail address.
It's easy-peasy.
Have an inspired Monday!

Jana


Pin It

Sunday, October 21, 2012

Freezer Paper Stencil T's

 
This summer, when I was staying with my sister for a week, we stenciled T-shirts with the kids.  I had been seeing things online about freezer paper stencils and I really wanted to try it out. It sounded pretty fun and relatively easy.  And, because my husband is a hunter, freezer paper is something we have laying around the house.  Bonus! Also, because I was at my sisters, we were able to use her Cricut to cut out the shapes we wanted.  At my house I probably would have had to do it by hand. 
Genius!
 
 
Supplies:
*Freezer Paper (sorry no picture) You can find it in the same aisle as aluminum foil and cling wrap.
*A way to cut out a stencil or desired design - we used the Cricut but you could do it by hand with an Exacto knife.
*T-shirt - I found ours at JoAnn fabrics for less than $3.00 each
*T-shirt paint - we used Tulip Brand
*Paint applicators
*Iron


After cutting out your desired design, you then place it on your t-shirt shiny side down. Use your iron to secure it to the shirt. It won't take too long


Place some kind of paper or protective barrier between the layers of your t-shirt to prevent the paint from bleeding through.
It's time to start applying the paint:


We put a small amount of paint in a small plastic cup and used the paint pouncers to apply it.  It was important to make sure you put a thick enough layer of paint on if you wanted it to be a uniform color.
 
 
I especially wanted a thick enough coat of paint with the white paint I was applying on the dark blue t-shirt. I wanted to make sure that the bird really 'popped' and  didn't look washed out at all.

 
When you are all done painting, carefully peel up the freezer paper.  Be very careful that none of the paper with wet paint on it accidentally touches your t-shirt.  The freezer paper made a really good seal and we didn't have any problems with bleeding through the lines.  It left a very crisp picture.
Set your finished t-shirt aside and let it dry completely.
Be sure to read the instructions on your paint bottle, some of the paint needs to be heat set before you wash it.
Here are all of the designs we made that day.


Although this was a craft activity that the kids couldn't do all of the steps on, they still enjoyed it and really loved wearing their shirts when they were all done.
I thought it was a pretty simple craft overall with a really good result. I was slightly stressed as I was helping them paint, just making sure they didn't spread the paint on the outside of their stencil or gob it on too thick, but that's just me.
I bought 4 small bottles of paint and I have enough paint after making all of these shirts to do the same amount of shirts all over again.  The paint stretches pretty far. At only about $1.75 a bottle, that's a pretty good value.
I really like the results of the shirt I made for myself and think it looks really nice. It would be hard to tell it apart from a store bought shirt.
So, I encourage you to get some freezer paper and some t-shirt paint.  The possibilities are endless and the results could be amazing!
Craft on people, craft on!
-Jana


Pin It

Friday, July 20, 2012

Look at What my Sister Did!

My sister saw this idea on Pinterest (of course).


You may have seen it too.
She thought it would look good in her front flower bed.
It does!
I don't have any instructions or pictures of it as it's being built, because I wasn't there, but it seems super simple.
You would need a long piece of re-bar,
pots in gradually increasing sizes,
spray paint, dirt, and flowers.


Spray paint the pots first and let them dry.
Drive your piece of re-bar into the ground.
You are going to have to do some measuring here.
Thread the first pot on the re-bar and fill with dirt.
Thread the next pot on the re-bar and fill with dirt.
Continue to do this with all the pots.


See how she has the pots tipped? You need to do that too.
That's what gives it that cool shape.
Then when you are all done, you get to put your plants in!
Want to know a secret?
If you wait to buy your annuals until the end of June, you can get them super cheap!
Wal-mart was selling them for a quarter a pot!
They all survived and look great too.
Even though they were exceptionally root bound.

My sister painted her pots to match her front porch rocking chairs.


This gives her beautiful home a pop of color.
I love the look.
Good job Jen!
Keep on getting those projects done! Pin It

Wednesday, May 30, 2012

Tutorial: Hooded Towel

O.k., I'm about to step out on a limb here and attempt my first ever tutorial.


What I would like to attempt to share with you, is how to make a hooded towel.  These towels are great to give for baby gifts, as a gift for a first birthday, or if made with a generously sized hood, you can give them as a gift to an older child.  My sons have used these all the way up to 7 and 8 years of age.  They love them! (beware -  hooded towels may result in naked children running through the house with their 'capes' flapping behind them)
I received my first hooded towel as a baby gift from my cousin when I was pregnant with my first son. 
Since then, I have started making them for just about everyone I know who is having a baby because we have loved them so much.  They are so much better than those thin towels they market and sell for babies on the shelves at your local department store.  I am a firm believer in 'if you love something, others might love it too, so share it!'

Here is what you will need to get started:

1 bath towel
1 hand towel in a matching/coordinating color
sewing machine & thread
ribbon
A rotary cutter, ruler and cutting mat
Scissors
seam ripper (just in case)


I typically get my towels from Target, but any good quality towels will do.


First, I like to sew the dart in the back of the bath towel:
To do that you fold the bath towel in half with the tag side on the outside.
Line up the edges and grab the towel at the center fold.  You are going to sew a line from the top edge of the towel, parallel to the fold, about 2" away from the fold.  Sew a straight line approx. 3 " long being sure to back tack at the end.


So it should look like this when you are done:


Then you are going to take the flap you have created and smoosh it flat.  So unfold the towel, take the flap, and evenly flatten it along either side of the crease you made:


See? Just like that.  Then you will want to sew that down along the edge of the towel.  This will keep it from shifting when you are sewing the hood on.
Got it?


Yay!  - this is what it looks like when you are done! 
Clip those nasty threads off please!


Here is the finished portion of the bath towel. 
See the nice pleat you've just created? 


Now we move on to the hood.  We are making a generous sized hood so that this towel can be used for babies all the way through young children.  If you want to make a smaller hood you could actually make two hoods out of one hand towel. Just cut it in half and use each half to make a hood.
But today we are using the hand towel to make one hood, so you will need to cut a portion of your hand towel off.  I used my sons head to measure how long I wanted the hood to be, basically I want the hood to nearly touch his shoulders.  That means I cut off about 5" off the end of my towel. 


In order to be able to have both sides match and be able to sew more easily, I cut the bulky finished edge off of the other side.


 Now you will take the finished edge on one side of the towel and fold it over about 2".  Make sure you look at your towel and decipher if there is a 'right' side and a 'wrong' side.  When you get your towel and hood sewn together you don't want it looking funky because you sewed one of them inside out.
In this step you are basically folding the towel so that the 'wrong' side is overlapping the 'right' side.
You are going to sew this down now.  What I do is eyeball it to keep it straight all the way down and then I sew a straight line right next to that finished edge of the towel, on the double thick side of course.  If you are no good at eyeballing, then go ahead and measure and pin this folded piece to keep it nice and even.


I like to embellish my hooded towels.  This is for cuteness factor only, it has nothing to do with function.  Although it in no way inhibits the function of the towel.
So get out some coordinating ribbon, cut it just longer than the length of the towel and sew it on.  Depending how thick the ribbon is, I will either simply sew it down the center, or I will sew it down along both sides.
 

When you are done it will look like this:


Next comes the tricksy part: the tuck in the back of the hood.

Fold your hood in half with the 'right' sides together. 


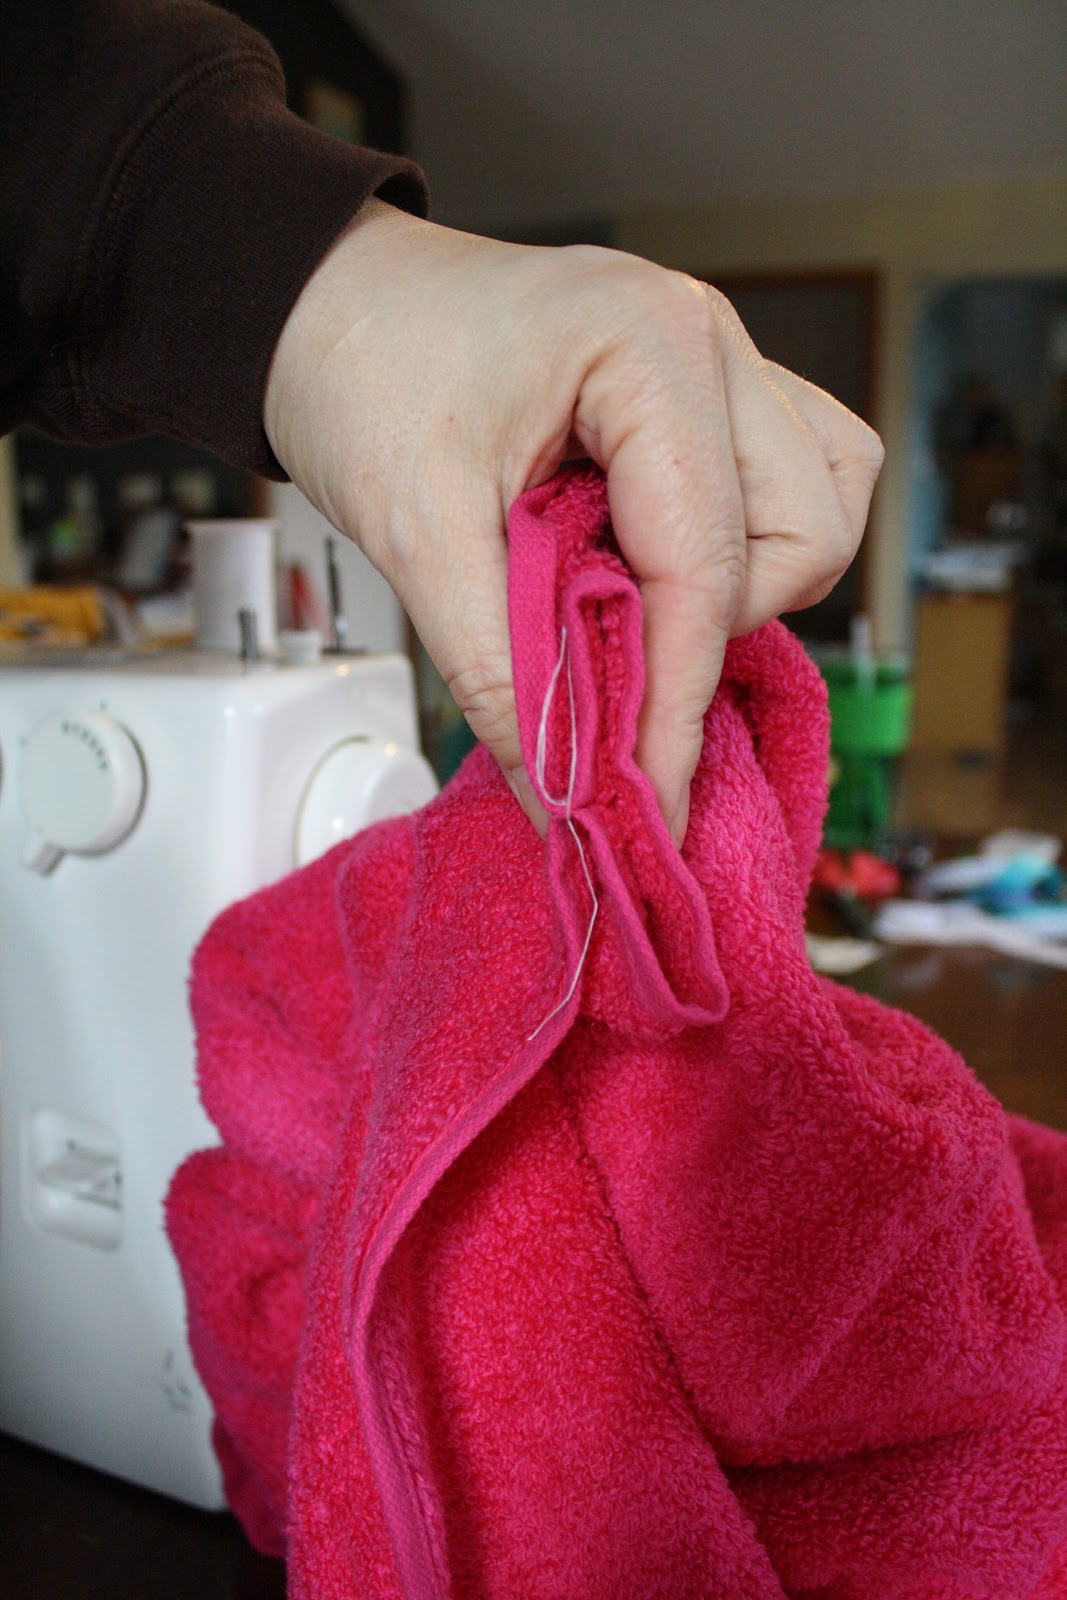
Along the fold, toward the back of the hood you are going to tuck the fold down in between the sides of the hood making a M shape with the towel. I find that this is easiest to do if I have the folded hood laying flat on the table in front of me.  Then I can grab the edge of the fold with my finger and pull it down sandwiching it between the sides of the towel. Make sense?  This is the hardest part, but the most important.


Keeping things together, stick that end in your sewing machine and about 2 1/2" from the edge, sew a straight line all the way from the top to the bottom.  You want the hood deep enough for baby's head to fit inside comfortably with some space for growing.


See?


Now go ahead and cut the excess fabric off after your straight sewn line. Leave about 1/4 to a 1/2 inch.


Here is your finished hood. You can adjust the size as needed.


This is what the back tuck in the hood should look like when you have finished it properly. This is the key to the function of this hood.  I like how it fits so much better than other hood styles I have seen.


Placing both of the 'right' sides together, match the raw edge side of the hood with the top of the bath towel where you sewed the pleat.  I like to match the center seam of the hood with the center seam of the pleat.  Here is where pinning could come in handy. 


Now you are going to sew the hood onto the towel!  Make sure to back tack at the beginning and end!  You are going to be sewing through a lot of bulk in the center of this towel.  Be sure to go slowly.  I have broken more than one needle while doing this step. I use about a 1/2" seam allowance while I'm sewing.  I try and get as close to the finished edge of the bath towel as I can (while not being able to see it).  When you are done sewing check and make sure you caught both towels the whole way, you don't want any open spots.
With that, you should be done!


 Wyat agreed to model the finished product for me, even though the towel is pink. 
A girl color. 
Which he was not thrilled about. 
But he still did it for me. 
Tate didn't have a problem modeling the purple towel.  
Apparently, that's a boy or girl color.
Seth flat out refused to have a pink towel touch his head!
Boys!


I hope the tutorial was clear enough and had enough pictures to make it easy to follow.  I'd love to hear your comments on what I could improve if you try this tutorial out.  I'd also love to see a picture of your finished product!
 I hope you are able to sew many hooded towels for the babies and toddlers in your life.  The naked super hero's running through the house make up for all the hard work. 
Thanks for stopping by!


Pin It